Windows 10
A regular (mini) PC with Microsoft Windows on it, is in general a very solid digital signage setup.
If you want to create an operating system image to more efficiently deploy players then please read our article specifically about this subject
In this section we'll show you how configure and what to install to turn your Windows PC into a player of your Playr content. The easiest way is to:
- Install Google Chrome
- Use our script to configure Windows
- optional: Check for updated video drivers from the hardware vendor
- optional: Configure turning the PC off and on automatically
Alternatively you can follow one or more of these manual steps:
- Install latest video drivers
- Install Google Chrome
- Disable Windows auto updates
- Disable energy saving
- Start Chrome automatically on startup
- Automatic player shutdown
- Automatic player start
- Automatic user login
Fast Installation
The fastest way to configure a (mini) PC with Windows 10 is described in the following steps, please follow them in order.
Install Google Chrome
If Google Chrome is not yet installed, open your current web browser and go to http://google.com/chrome and then download and install Google Chrome as instructed.
Configure Using Our Script
- Download this zip file to the
Downloadsfolder and unzip it by right-clicking on it and selecting Extract All.... - Navigate to the folder to which the files were extracted (
Downloads\playr-loader-master\player-loader-master) and then right-click on the file EnablePowershellScripts and select the option Run as administrator. If you get a Microsoft Defender security message, click on More info and click the Run anyway button.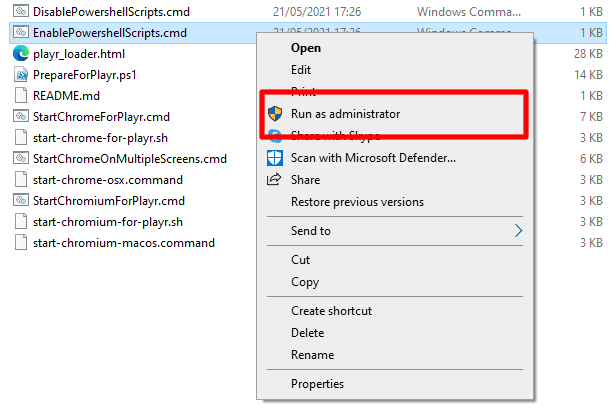
- Confirm the pop up
- You will see a confirmation that powershell execution is enabled

- Click on the Windows icon to open the start menu and type
powershell, with your mouse right-click on the item at the top of the start menu named Windows Powershell and select the Run as administrator option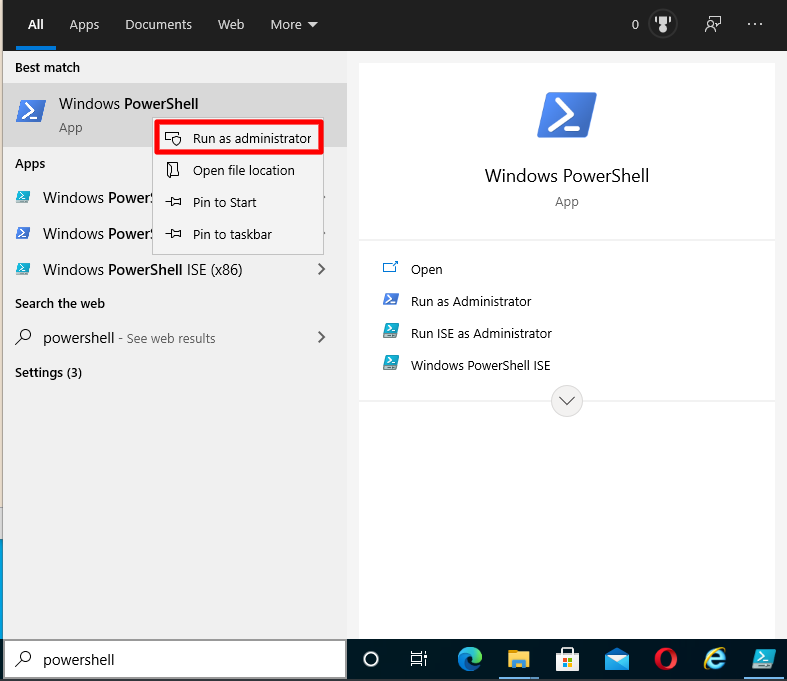
- Confirm the pop up
- In the Powershell window that has opened go to the unzipped folder inside the
Downloadsfolder by typingcd $Env:USERPROFILE\Downloads\playr-loader-master\playr-loader-masterand pressing Enter - Now execute our script by typing
.\PrepareForPlayr.ps1and pressing Enter. The script will run and report on the steps it performs. After the script you will see something similar to this screenshot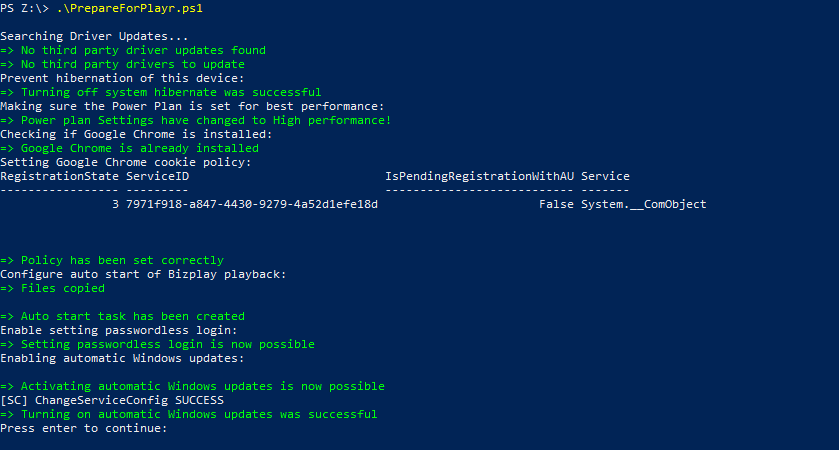
- Now go back to your Windows Explorer where you enabled the ability to run scripts (in step 2), right-click on DisablePowershellScripts and select the option Run as administrator.
- You will see a confirmation that powershell execution is disabled

- If you want you can delete the
playr-loader-masterfolder from theDownloadsfolder - Now we will enable automatic login; on the bottom left, click the Windows icon and then type
netplwizand press Enter. - In the User Accounts window that pops up, uncheck the Users must enter a user name and password to use this computer option
- You will be prompted for the user's password, after which you can accept the new configuration with Ok.
- In the taskbar, click the Windows icon and select Settings (the gear icon).
- Type
Change the signin the search field at the top of the window. - Click Change the sign-in requirements.
- Under Require sign-in select Never.
Check Video Drivers
Although optional, since the script you just used updates Windows (GPU) drivers, this step can improve the performance of your device:
- Search for the support page on the website of the manufacturer of your (mini) PC that contains drivers for your specific model. This comes usually in the form of an executable or file that will be handled by Windows10 after you have downloaded it. Usually there are multiple files available. Search for drivers for you (embedded) GPU.
- Select the newest version of the driver and download it
- Usually by double clicking the downloaded file either an install-application is executed that installs the drivers or Windows will install the driver automatically.
Automatic Startup And Shutdown
Although optional this step will turn your into a "real" player; by automatically starting and stopping Windows the device basically needs no attention; you can remove the mouse and keyboard and install the device behind the TV screen. Everything will work automatically.
To automatically wake your computer out of sleep mode.
- On the bottom left, click the Windows icon and then type
Schedule. - Click Task scheduler.
- Choose Create basic task and name it
Start up, click Next. - Set the trigger to Daily and click Next.
- Set the time the computer has to wake up, set Recur every to 1 day and click Next.
- Set the Action to Start a Program and click Next.
- Set the Program to
ipconfig.exeand set the Argument to/renewand click Next - On the last page check Open the Properties dialog for this task when I click Finish and click Finish.
- On the General tab under Security options check Run whether user is logged on or not and check Run with the highest privileges.
- On the Conditions tab under Power check Wake up computer to run this task.
Still in the Task Scheduler we now create a task to suspend the PC
- Click Create basic task and name it
Shut down, click Next. - Set the trigger to Daily and click Next.
- Set the Action to Start a Program and click Next.
- Set the Program to
C:\Windows\System32\rundll32.exeand set the Argument topowrprof.dll,SetSuspendState 0,1,0and click Next. - On the last page check Open the Properties dialog for this task when I click Finish and click Finish.
- On the General tab under Security options check Run whether user is logged on or not and check Run with the highest privileges.
The good news: you are done! If you now shut down your PC and turn it back on you should be presented with our registration screen. Register the player and you are off to the races.
Manual Installation And Configuration
If you want to know exactly what changes are needed to turn your PC into a "player" or if you ran into problems during the setup using our script you can either follow all the steps below or pick the ones that you need.
Latest Video Drivers
For optimal graphics performance, make sure you are running the latest video drivers on your computer.
- On the bottom left, click the Windows icon and then the gear icon.
- Type
Displayin the search field at the top of the window. - Click Display settings.
- Click Advanced display settings.
- Click Display adapter properties.
- On the Adapter tab click the Properties button.
- On the Driver tab click Update driver.
- Click Search automatically for updated driver software.
- A message will appear to tell you the driver is up to date or instructions on how to update your driver.
Google Chrome Installation
- If Google Chrome is not yet installed, open your current web browser and go to http://google.com/chrome and then download and install the latest version of Google Chrome as instructed.
- When asked, set Chrome to be your default browser.
- If Chrome is already installed you can set it as the default browser:
- in Chrome, click the button on the top right with the three horizontal lines (or dots depending on the version of Chrome)
- click Settings
- select Make Google Chrome my default browser
- Now make sure that videos with sound can play correctly:
- Type
chrome://settings/content/soundin the address bar. - In the section Allow press the Add button.
- Type
[*.]playr.bizand press Add.
- Type
Disable Windows Auto-Updates
Just like you don't want Chrome to automatically update, you also want the same for Windows. On a regular computer that you use yourself every day this is bad advice, especially since you need to be protected against the latest threats when pulling in e-mail, downloading unknown programs and visiting all kinds of new websites. However, on a computer that only visits the same well-known website over and over again, this is less of an issue. Instead you want to make sure that the channel playback does not get interrupted by any update procedure.
In Windows 10, they made it difficult to disable auto-updates. The way to do it is to tell Windows that your network connection is a "metered connection". By default you cannot configure a wired connection as "metered connection". Here are the steps to do configure both your WiFi and wired network as "metered connections":
- First we need to get permissions to reconfigure the networks connections:
- On the bottom left, click the Windows icon and then type regedit.
- Click the regedit command that pops up and confirm that you like to open it.
- On the left hand side, navigate to the folder
HKEY_LOCAL_MACHINE\SOFTWARE\Microsoft\Windows NT\CurrentVersion\NetworkList\DefaultMediaCost - Right click on the DefaultMediaCost folder and select Permisssions...
- Click on the Advanced button.
- On the top of the next window, you'll see an Owner: listed (usually this is TrustedInstaller). Click Change.
- In the Enter the object name to select box, type the name of your Windows user account.
- Click the Check Names button to validate the account name.
- Click Ok.
- In the Permission entries list, also find the name of your Windows user account and double click on it. Then enable Full Control under Basic permissions.
- Click Ok in this and all former windows to finalize this process.
- Now we can make the WiFi and wired network setting configurable as a "metered connection":
- Download this zip file.
- Go to the folder where the file was downloaded and double click it to unzip.
- Double click the
Enable Metered Ethernet Connection.regfile to configure the network connections as "metered connections". - If asked for permission to change the registry, accept.
This should basically take care of auto-updates. There are a few more things that you can change, but they shouldn't be strictly necessary. Please refer to this How-To Geek article for more details.
Disable Energy Saving Mode
To make sure that the screen does not turn black after a few minutes, do the following:
- On the bottom left, click the Windows icon and then the gear icon.
- Type
Powerin the search field at the top of the window. - Click Power Options.
- Select the High performance plan (possibly hidden under Show additional plans).
- Click to the right of this plan Change plan settings.
- Select Never for all options.
- If available, set both Brightness sliders to the right most position.
Automatically Start Chrome On Startup
To make Google Chrome start automatically when Windows starts, do the following:
- Download this zip file and unpack it to the Desktop of your computer. Place the files
StartChromeForPlayr.cmdandplayr_loader.htmlon your Desktop. - Check if Chrome starts up by double clicking the
StartChromeForPlayr.cmdfile. If Chrome starts full screen and shows a Playr (player registration) page, then this works correctly. - On the bottom left, click the Windows icon and then type
Schedule. - Click Task scheduler.
- Choose Create basic task and name it
Start Chrome for Playr, click Next. - Set that this task has to be executed When I log in, click Next.
- Choose the action Start a program, click Next.
- Click the Browse button and select the
StartChromeForPlayr.cmdfile on the Desktop. - To make startup more smooth: check “Open the Properties dialog for this task when I click Finish” before you click Finish.
- Go to the Triggers tab, click At log on trigger and choose Edit...
- Under Advanced settings, check Delay task for and choose 30 Seconds. This way Chrome will start up 30 seconds after Windows has started. This will allow for network and internet connections to have been established.
Automatic Player Shutdown (Sleep Mode)
If you like to save some energy, you can set the computer to go into sleep mode when you like your channel to stop playing.
- On the bottom left, click the Windows icon and then type
Schedule. - Click Task scheduler.
- Choose Create basic task and name it
Shut down, click Next. - Set the trigger to Daily and click Next.
- Set the Action to Start a Program and click Next.
- Set the Program to
C:\Windows\System32\rundll32.exeand set the Argument topowrprof.dll,SetSuspendState 0,1,0and click Next. - On the last page check Open the Properties dialog for this task when I click Finish and click Finish.
- On the General tab under Security options check Run whether user is logged on or not and check Run with the highest privileges.
Automatic Player Startup
Create a task to automatically wake your computer out of sleep mode.
- On the bottom left, click the Windows icon and then type
Schedule. - Click Task scheduler.
- Choose Create basic task and name it
Start up, click Next. - Set the trigger to Daily and click Next.
- Set the time the computer has to wake up, set Recur every to 1 day and click Next.
- Set the Action to Start a Program and click Next.
- Set the Program to
ipconfig.exeand set the Argument to/renewand click Next - On the last page check Open the Properties dialog for this task when I click Finish and click Finish.
- On the General tab under Security options check Run whether user is logged on or not and check Run with the highest privileges.
- On the Conditions tab under Power check Wake up computer to run this task.
It depends on the computer you are using if this automatic startup is going to work. So be sure to test it. The alternative is to set auto-startup in the computer's BIOS. You will have to read the BIOS user manual to find out if and how that works on that specific computer. For more details on this, also check the Linux section.
Disable User Login
You want to disable user login so that the playback device automatically starts playing content when it's powered on.
- On the bottom left, click the Windows icon and then type netplwiz and press enter.
- In the User Accounts window that pops up, there should be a Users must enter a user name and password to use this computer option, if so uncheck it. If the option is not present you can make it "appear" by performing the following steps;
- Download this zipped registry file
- Unzip the file to get the registry file called
netplwiz.reg - Double click the
netplwiz.regfile to let it make a change in the Windows registry that will make the option appear - Now close the User Accounts window and open it again, the option will be present, uncheck it
- You will be prompted for the user's password, after which you can accept the new configuration with Ok.
Then remove the last sign-in restriction with with the following steps:
- On the bottom left, click the Windows icon and then the gear icon.
- Type Change the sign in the search field at the top of the window.
- Click Change the sign-in requirements.
- Under Require sign-in select Never.