Windows 11
A regular (mini) PC with Microsoft Windows on it, is in general a very solid digital signage setup.
If you want to create an operating system image to more efficiently deploy players then please read our article specifically about this subject
A General Concern On Windows 11
Windows 11 has a well known regression/problem when compared to all previous versions of Windows that affects use for signage playback; the Windows taskbar is going to get visible even if an applicaiton is running in full screen mode. This means that the Windows Taskbar can become visible even though a browser like Edge or Chrome is set up to show in full screen mode. This cannot be fully prevented by the command line parameters that these browser offer for this purpose.
Our scripts, used in the Fast Installation use a number of ways to mitigate the risk of the Taskbar becoming visible. The only way to make sure that the Taskbar will never show requires additional steps and specific versions of Windows. The procedure for this install is described in the Enterpirse Installation.
For those interested in the technical details of the Taskbar appearing problem: Because the browser parameters mentioned above create a borderless maximized window and rely on Windows' own "fullscreen detection" to keep the taskbar hidden. On Windows 11 that detection gets re-evaluated by shell components, and the taskbar re-asserts its z-order on top of your app. This is differently from how Windows 10 (and older versions) behave. The Windows 11 taskbar was rewritten (it's a new XAML/UWP-hosted implementation inside explorer.exe, not the classic Win32 taskbar from Win10 and earlier). That rewrite introduced a long-standing bug where the taskbar floats above full-screen windows applications.
In this section we'll show you how configure and what to install to turn your Windows PC into a player of your Playr content. The easiest way is to:
- Install Google Chrome
- Use our script to configure Windows
- optional: Check for updated video drivers from the hardware vendor
- optional: Configure turning the PC off and on automatically
The enterprise way requires Windows 11 Enterprise, Education, or IoT Enterprise. It is NOT AVAILABLE on Windows 11 Pro or Home.
- Install Google Chrome
- Use our script to replace de default shell launcher
- optional: Check for updated video drivers from the hardware vendor
- optional: Configure turning the PC off and on automatically
Alternatively you can follow one or more of these manual steps:
- Install latest video drivers
- Install Google Chrome
- Disable Windows auto updates
- Disable energy saving
- Start Chrome automatically on startup
- Automatic player shutdown
- Automatic player start
- Automatic user login
Fast Installation
The fastest way to configure a (mini) PC with Windows 11 is described in the following steps, please follow them in order.
Install Google Chrome
If Google Chrome is not yet installed, open your current web browser and go to http://google.com/chrome and then download and install Google Chrome as instructed.
Configure Using Our Script
- Download this zip file to the
Downloadsfolder and unzip it by right-clicking on it and selecting Extract All.... - Navigate to the folder to which the files were extracted (
Downloads\playr-loader-master\player-loader-master) and then right-click on the file EnablePowershellScripts and select the option Run as administrator. If you get a Microsoft Defender security message, click on More info and click the Run anyway button.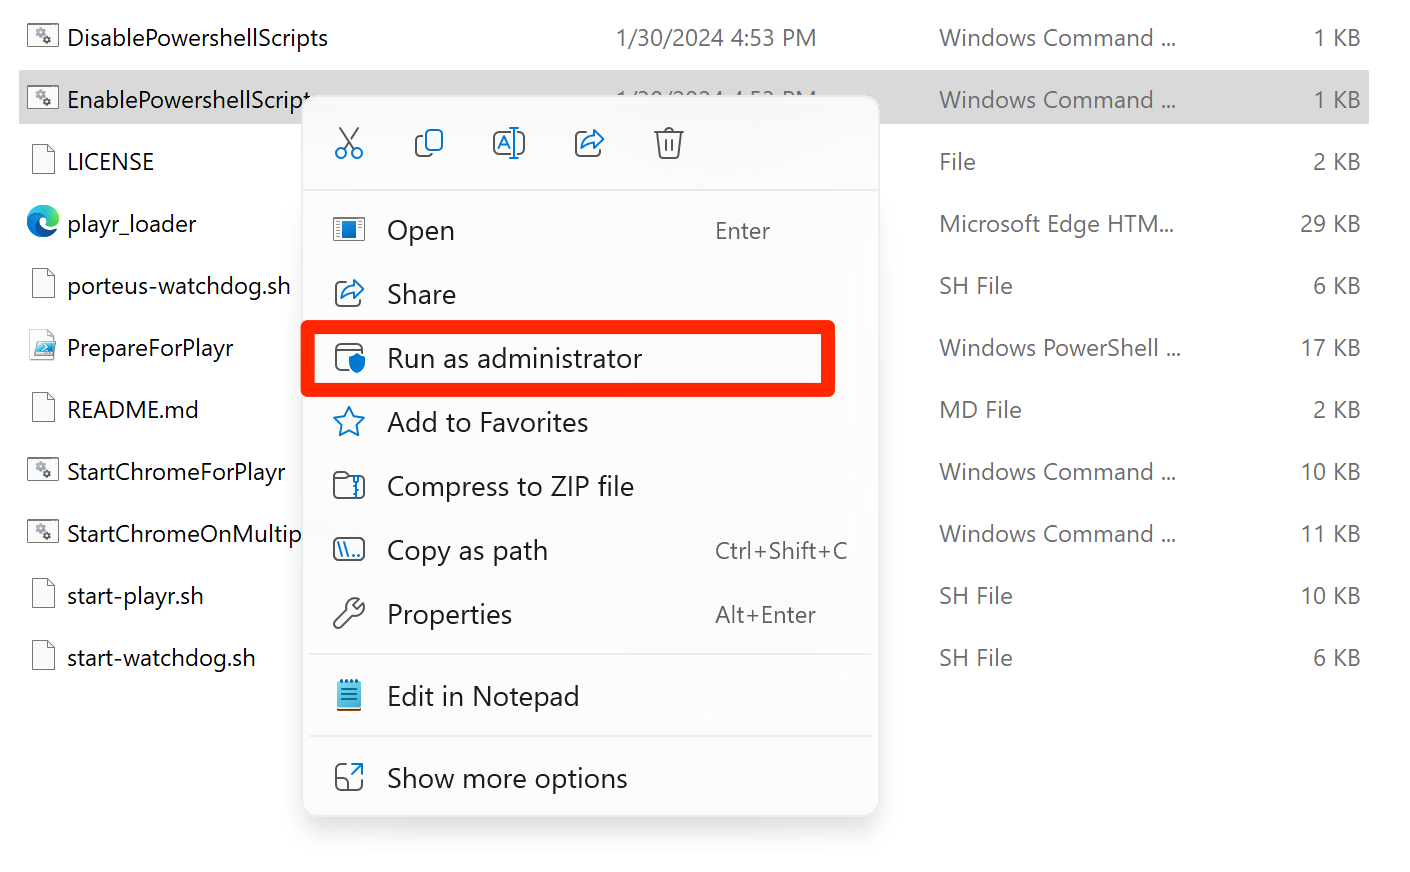
- Confirm the pop up
- You will see a confirmation that powershell execution is enabled

- Click on the Windows icon to open the start menu and type
powershell, with your mouse right-click on the item at the top of the start menu named Windows Powershell and select the Run as administrator option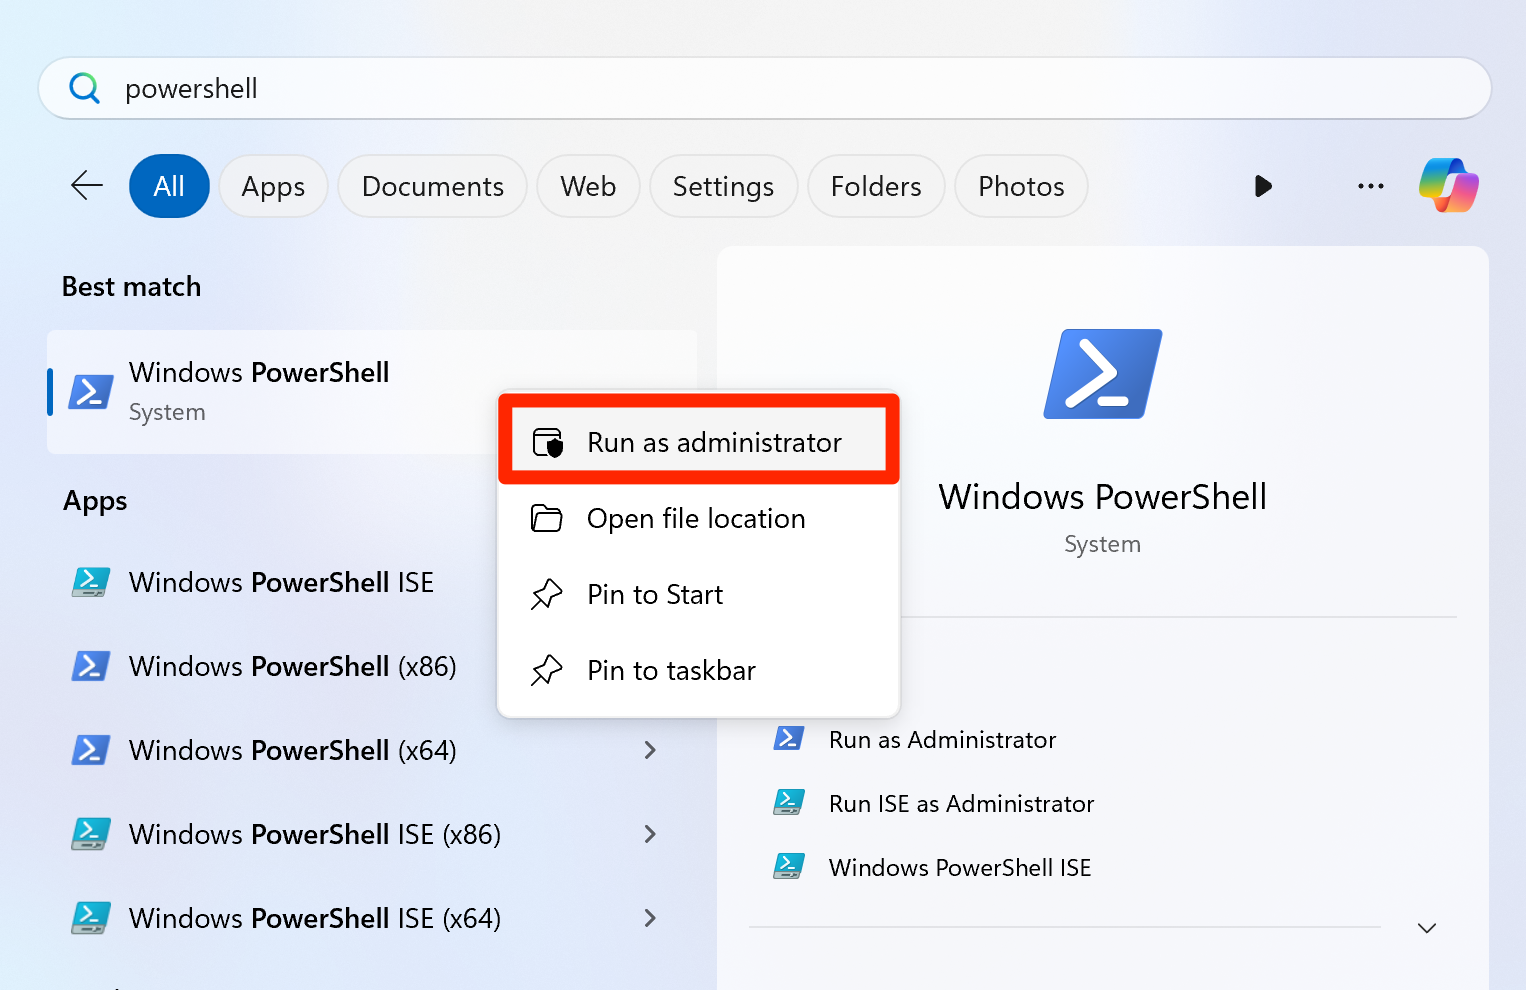
- Confirm the pop up
- In the Powershell window that has opened go to the unzipped folder inside the
Downloadsfolder by typingcd $Env:USERPROFILE\Downloads\playr-loader-master\playr-loader-masterand pressing Enter - Now execute our script by typing
.\PrepareForPlayr.ps1and pressing Enter. The script will run and report on the steps it performs. After the script you will see something similar to this screenshot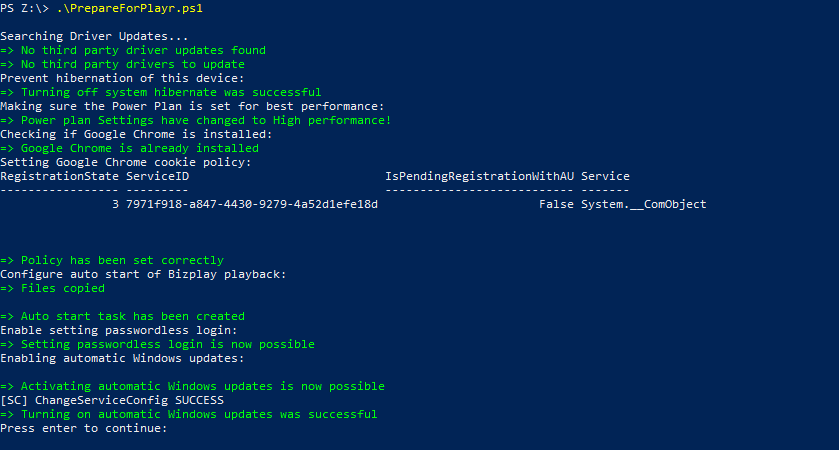 It is possible that some of the settings that this script attampts to make are not allowed on the device. In that case it will give information on how to achieve the same using an alternative method.
 - Now go back to your Windows Explorer where you enabled the ability to run scripts (in step 2), right-click on DisablePowershellScripts and select the option Run as administrator.
- You will see a confirmation that powershell execution is disabled

- If you want you can delete the
playr-loader-masterfolder from theDownloadsfolder - Now we will enable automatic login; on the bottom left, click the Windows icon and then type
netplwizand press Enter. - In the User Accounts window that pops up, uncheck the Users must enter a user name and password to use this computer option
- You will be prompted for the user's password, after which you can accept the new configuration with Ok.
Check Video Drivers
Although optional, since the script you just used updates Windows (GPU) drivers, this step can improve the performance of your device:
- Search for the support page on the website of the manufacturer of your (mini) PC that contains drivers for your specific model. This comes usually in the form of an executable or file that will be handled by Windows11 after you have downloaded it. Usually there are multiple files available. Search for drivers for you (embedded) GPU.
- Select the newest version of the driver and download it
- Usually by double clicking the downloaded file either an install-application is executed that installs the drivers or Windows will install the driver automatically.
Automatic Startup And Shutdown
Although optional this step will turn your into a "real" player; by automatically starting and stopping Windows the device basically needs no attention; you can remove the mouse and keyboard and install the device behind the TV screen. Everything will work automatically.
To automatically wake your computer out of sleep mode.
- On the bottom left, click the Windows icon and then type
Schedule. - Click Task scheduler.
- Choose Create basic task and name it
Start up, click Next. - Set the trigger to Daily and click Next.
- Set the time the computer has to wake up, set Recur every to 1 day and click Next.
- Set the Action to Start a Program and click Next.
- Set the Program to
ipconfig.exeand set the Argument to/renewand click Next - On the last page check Open the Properties dialog for this task when I click Finish and click Finish.
- On the General tab under Security options check Run whether user is logged on or not and check Run with the highest privileges.
- On the Conditions tab under Power check Wake up computer to run this task.
Still in the Task Scheduler we now create a task to suspend the PC
- Click Create basic task and name it
Shut down, click Next. - Set the trigger to Daily and click Next.
- Set the Action to Start a Program and click Next.
- Set the Program to
C:\Windows\System32\rundll32.exeand set the Argument topowrprof.dll,SetSuspendState 0,1,0and click Next. - On the last page check Open the Properties dialog for this task when I click Finish and click Finish.
- On the General tab under Security options check Run whether user is logged on or not and check Run with the highest privileges.
The good news: you are done! If you now shut down your PC and turn it back on you should be presented with our registration screen. Register the player and you are off to the races.
Enterprise Installation
PLEASE NOTE: this approach requires Windows 11 Enterprise, Education, or IoT Enterprise. It is NOT AVAILABLE on Windows 11 Pro or Home. This description assumes familiarity with Windows management in Enterprise environments and will be less detailed as the paragraphs above that are aimed at less informed users.
TLDR
This approach is a provisioning/imaging task, and should preferably not be done as a configuration on individual devices. Because of the fact that in this approach the default Windows Shell Launcher is replaced the risk of the Taskbar showing up on the screens is removed completely.
Configuring Playr Playback As Shell Launcher
Follow these steps:
- Confirm/obtain the right edition (Enterprise / Education / IoT Enterprise) on each player.
- Enable the Shell Launcher optional feature — it's part of the Client-DeviceLockdown optional feature (enabled via DISM / Enable-WindowsOptionalFeature). Exact feature name should be verified against your build.
- Create a dedicated local standard user account for the signage session (the "kiosk" account), separate from an admin "break-glass" account you keep for maintenance.
- Set the custom shell for that account to your existing launcher, e.g. cmd.exe /c "C:\playr\StartChromeForPlayr.cmd" (or the multi-screen script). Because your script has a never-exiting watchdog loop, it stays running as the shell and keeps spawning/monitoring Chrome exactly as today.
- Configure the shell "return code" actions (restart the shell / restart the device / shut down) so the session self-heals if the script ever does exit.
- Configure auto-logon for the kiosk account so the device boots straight into it. On boot: auto-logon → Shell Launcher starts your script → your script launches Chrome. explorer.exe never runs for that account.
- Deploy the config via one of: a PowerShell script using the Shell Launcher WMI classes (root\standardcimv2\embedded, WESL_UserSetting), a provisioning package (Windows Configuration Designer), or Intune/MDM (AssignedAccess/ShellLauncher CSP) if the fleet is managed.
Day-to-day implications to weigh
- No taskbar, Start, Widgets, notifications, or Action Center for that account → the entire class of "taskbar reappears" bugs is gone at the source, plus fewer accidental interactions.
- Maintenance is different: there's no desktop. You get to an admin session via Ctrl+Alt+Del → Switch user / Sign out, then log into your separate admin account. Plan this "break-glass" path before deploying, or you can lock yourself out.
- Remote management: if you rely on RDP/remote tools, confirm they still work under the kiosk account (they generally do, but test).
- Updates/reboots still happen — but auto-logon + Shell Launcher brings the signage back automatically. LTSC minimizes how often this interrupts you.
- Some shell-dependent features (system tray, certain drag/drop, shell notifications) won't be available — which for signage is exactly what you want.
Rollback / testing
- Test on one device first. Keep the admin account + a documented way to disable Shell Launcher (restore
explorer.exeas the shell) before rolling to the fleet. - Rollback is: sign into the admin account → disable the Shell Launcher setting (or the optional feature) → the account reverts to the normal
explorer.exeshell.
Check Video Drivers
Automatic Startup And Shutdown
See the paragraph above, or use the features of Windows 11 Enterprise or tools like Microsoft Intune to schedule automatic startup and shutdown of player devices.
Manual Installation And Configuration
If you want to know exactly what changes are needed to turn your PC into a "player" or if you ran into problems during the setup using our script you can either follow all the steps below or pick the ones that you need.
Latest Video Drivers
For optimal graphics performance, make sure you are running the latest video drivers on your computer.
- On the bottom left, click the Windows icon and then the gear icon.
- Type
Displayin the search field at the top of the window. - Click Display settings.
- Click Advanced display settings.
- Click Display adapter properties.
- On the Adapter tab click the Properties button.
- On the Driver tab click Update driver.
- Click Search automatically for updated driver software.
- A message will appear to tell you the driver is up to date or instructions on how to update your driver.
Google Chrome Installation
- If Google Chrome is not yet installed, open your current web browser and go to http://google.com/chrome and then download and install the latest version of Google Chrome as instructed.
- When asked, set Chrome to be your default browser.
- If Chrome is already installed you can set it as the default browser:
- in Chrome, click the button on the top right with the three horizontal lines (or dots depending on the version of Chrome)
- click Settings
- select Make Google Chrome my default browser
- Now make sure that videos with sound can play correctly:
- Type
chrome://settings/content/soundin the address bar. - In the section Allow press the Add button.
- Type
[*.]playr.bizand press Add.
- Type
Disable Windows Auto-Updates
Just like you don't want Chrome to automatically update, you also want the same for Windows. On a regular computer that you use yourself every day this is bad advice, especially since you need to be protected against the latest threats when pulling in e-mail, downloading unknown programs and visiting all kinds of new websites. However, on a computer that only visits the same well-known website over and over again, this is less of an issue. Instead you want to make sure that the channel playback does not get interrupted by any update procedure.
- Click the start menu icon, type
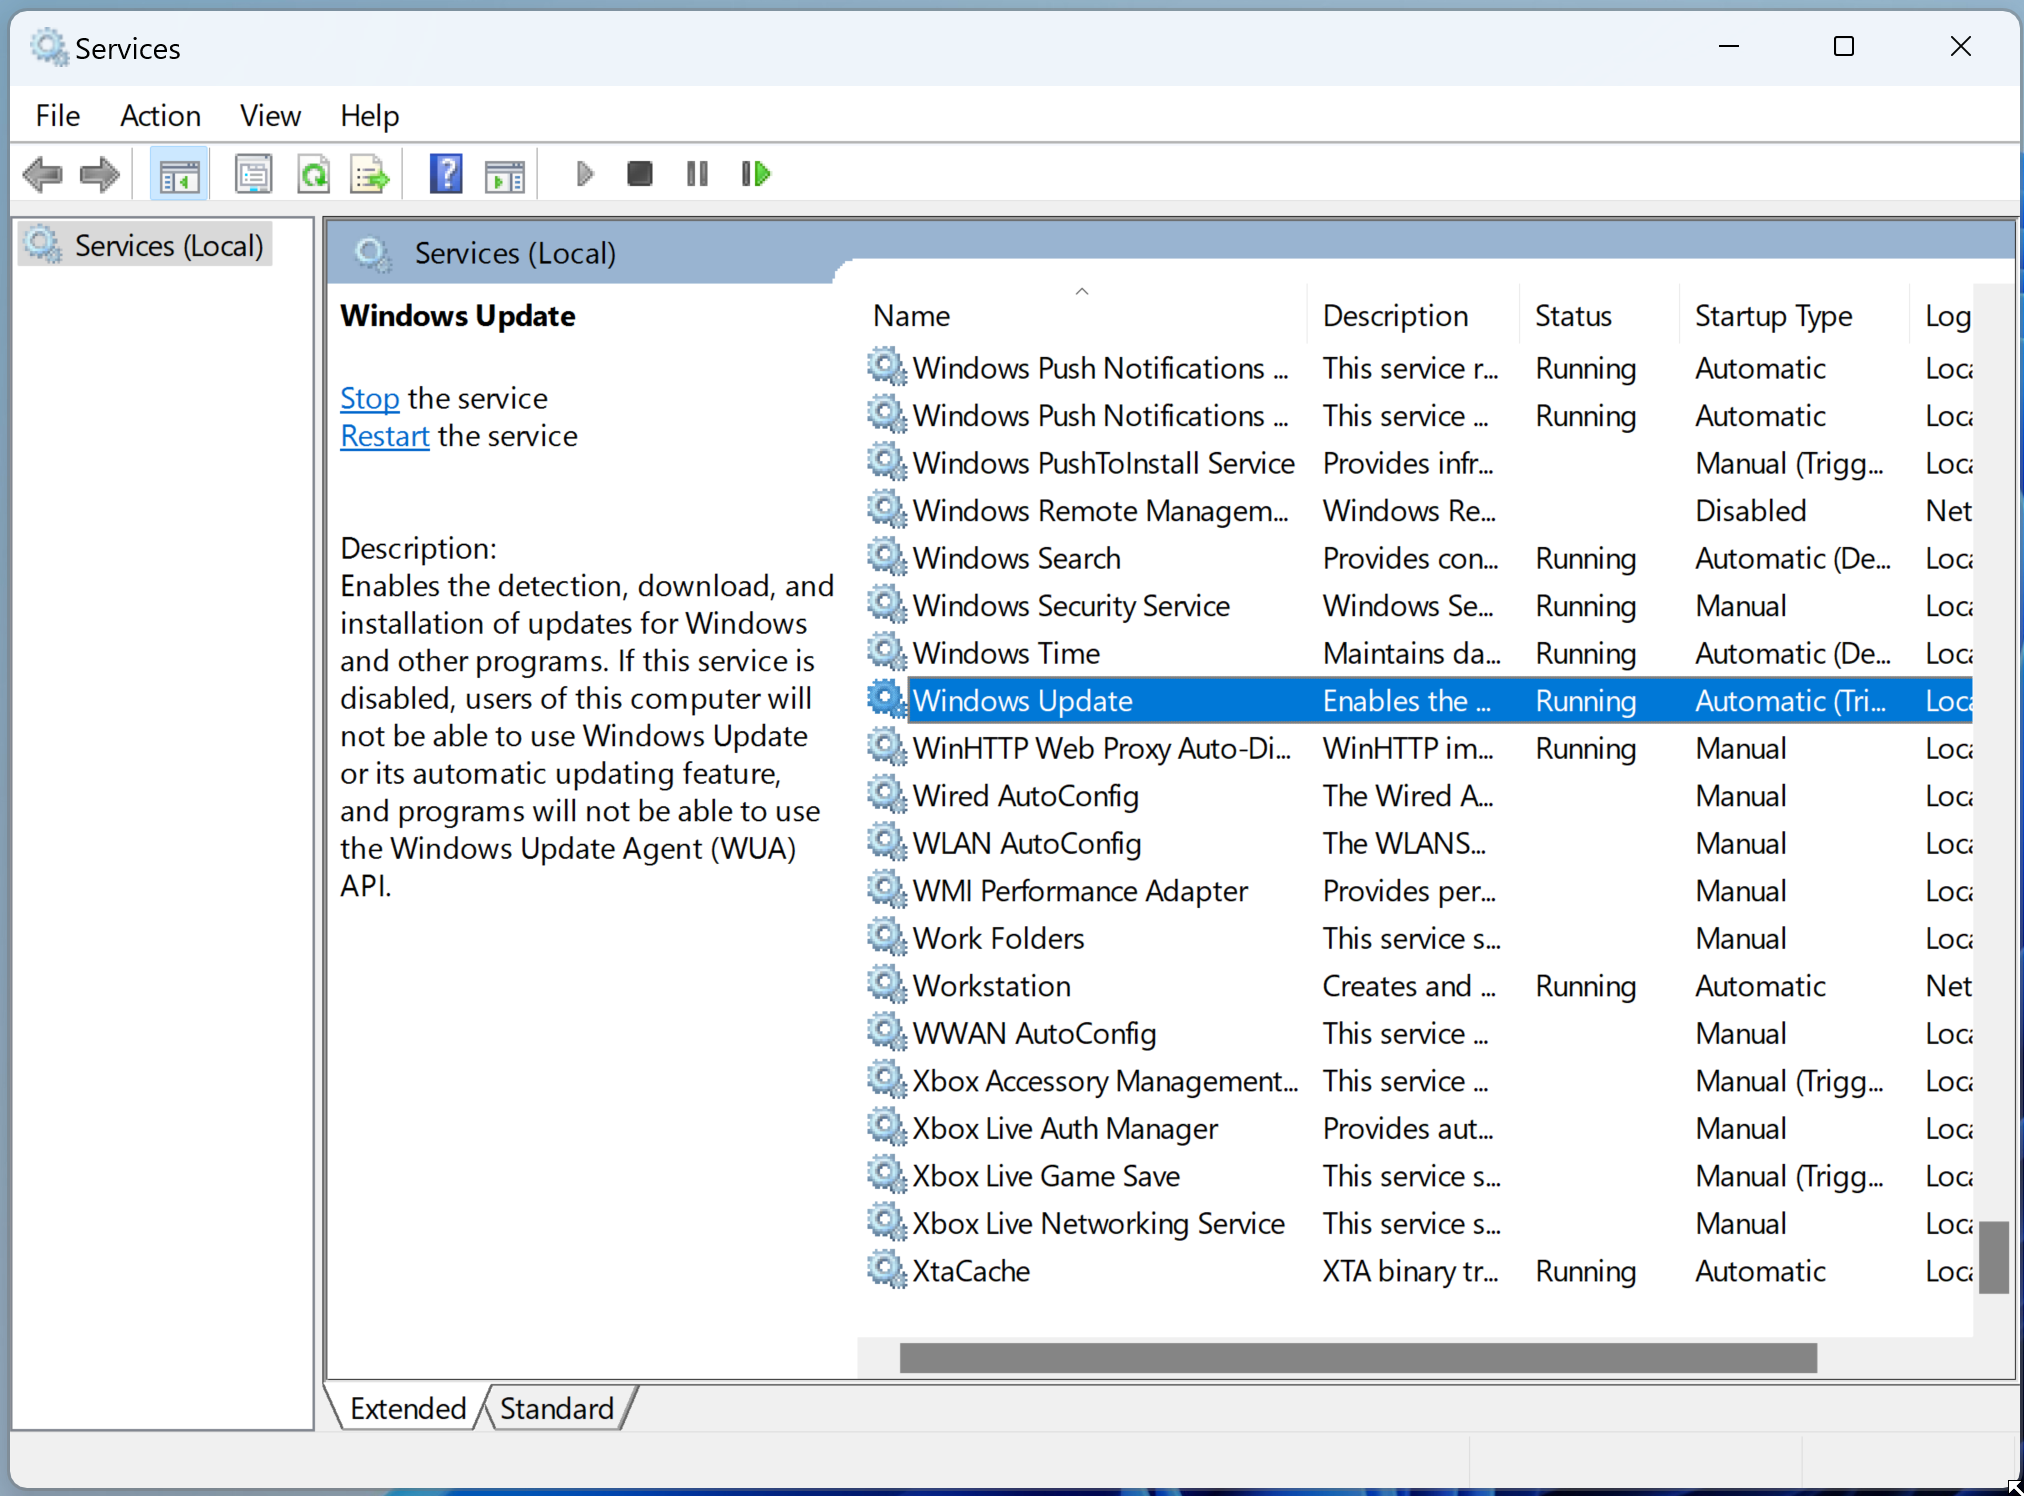
servicesand press Enter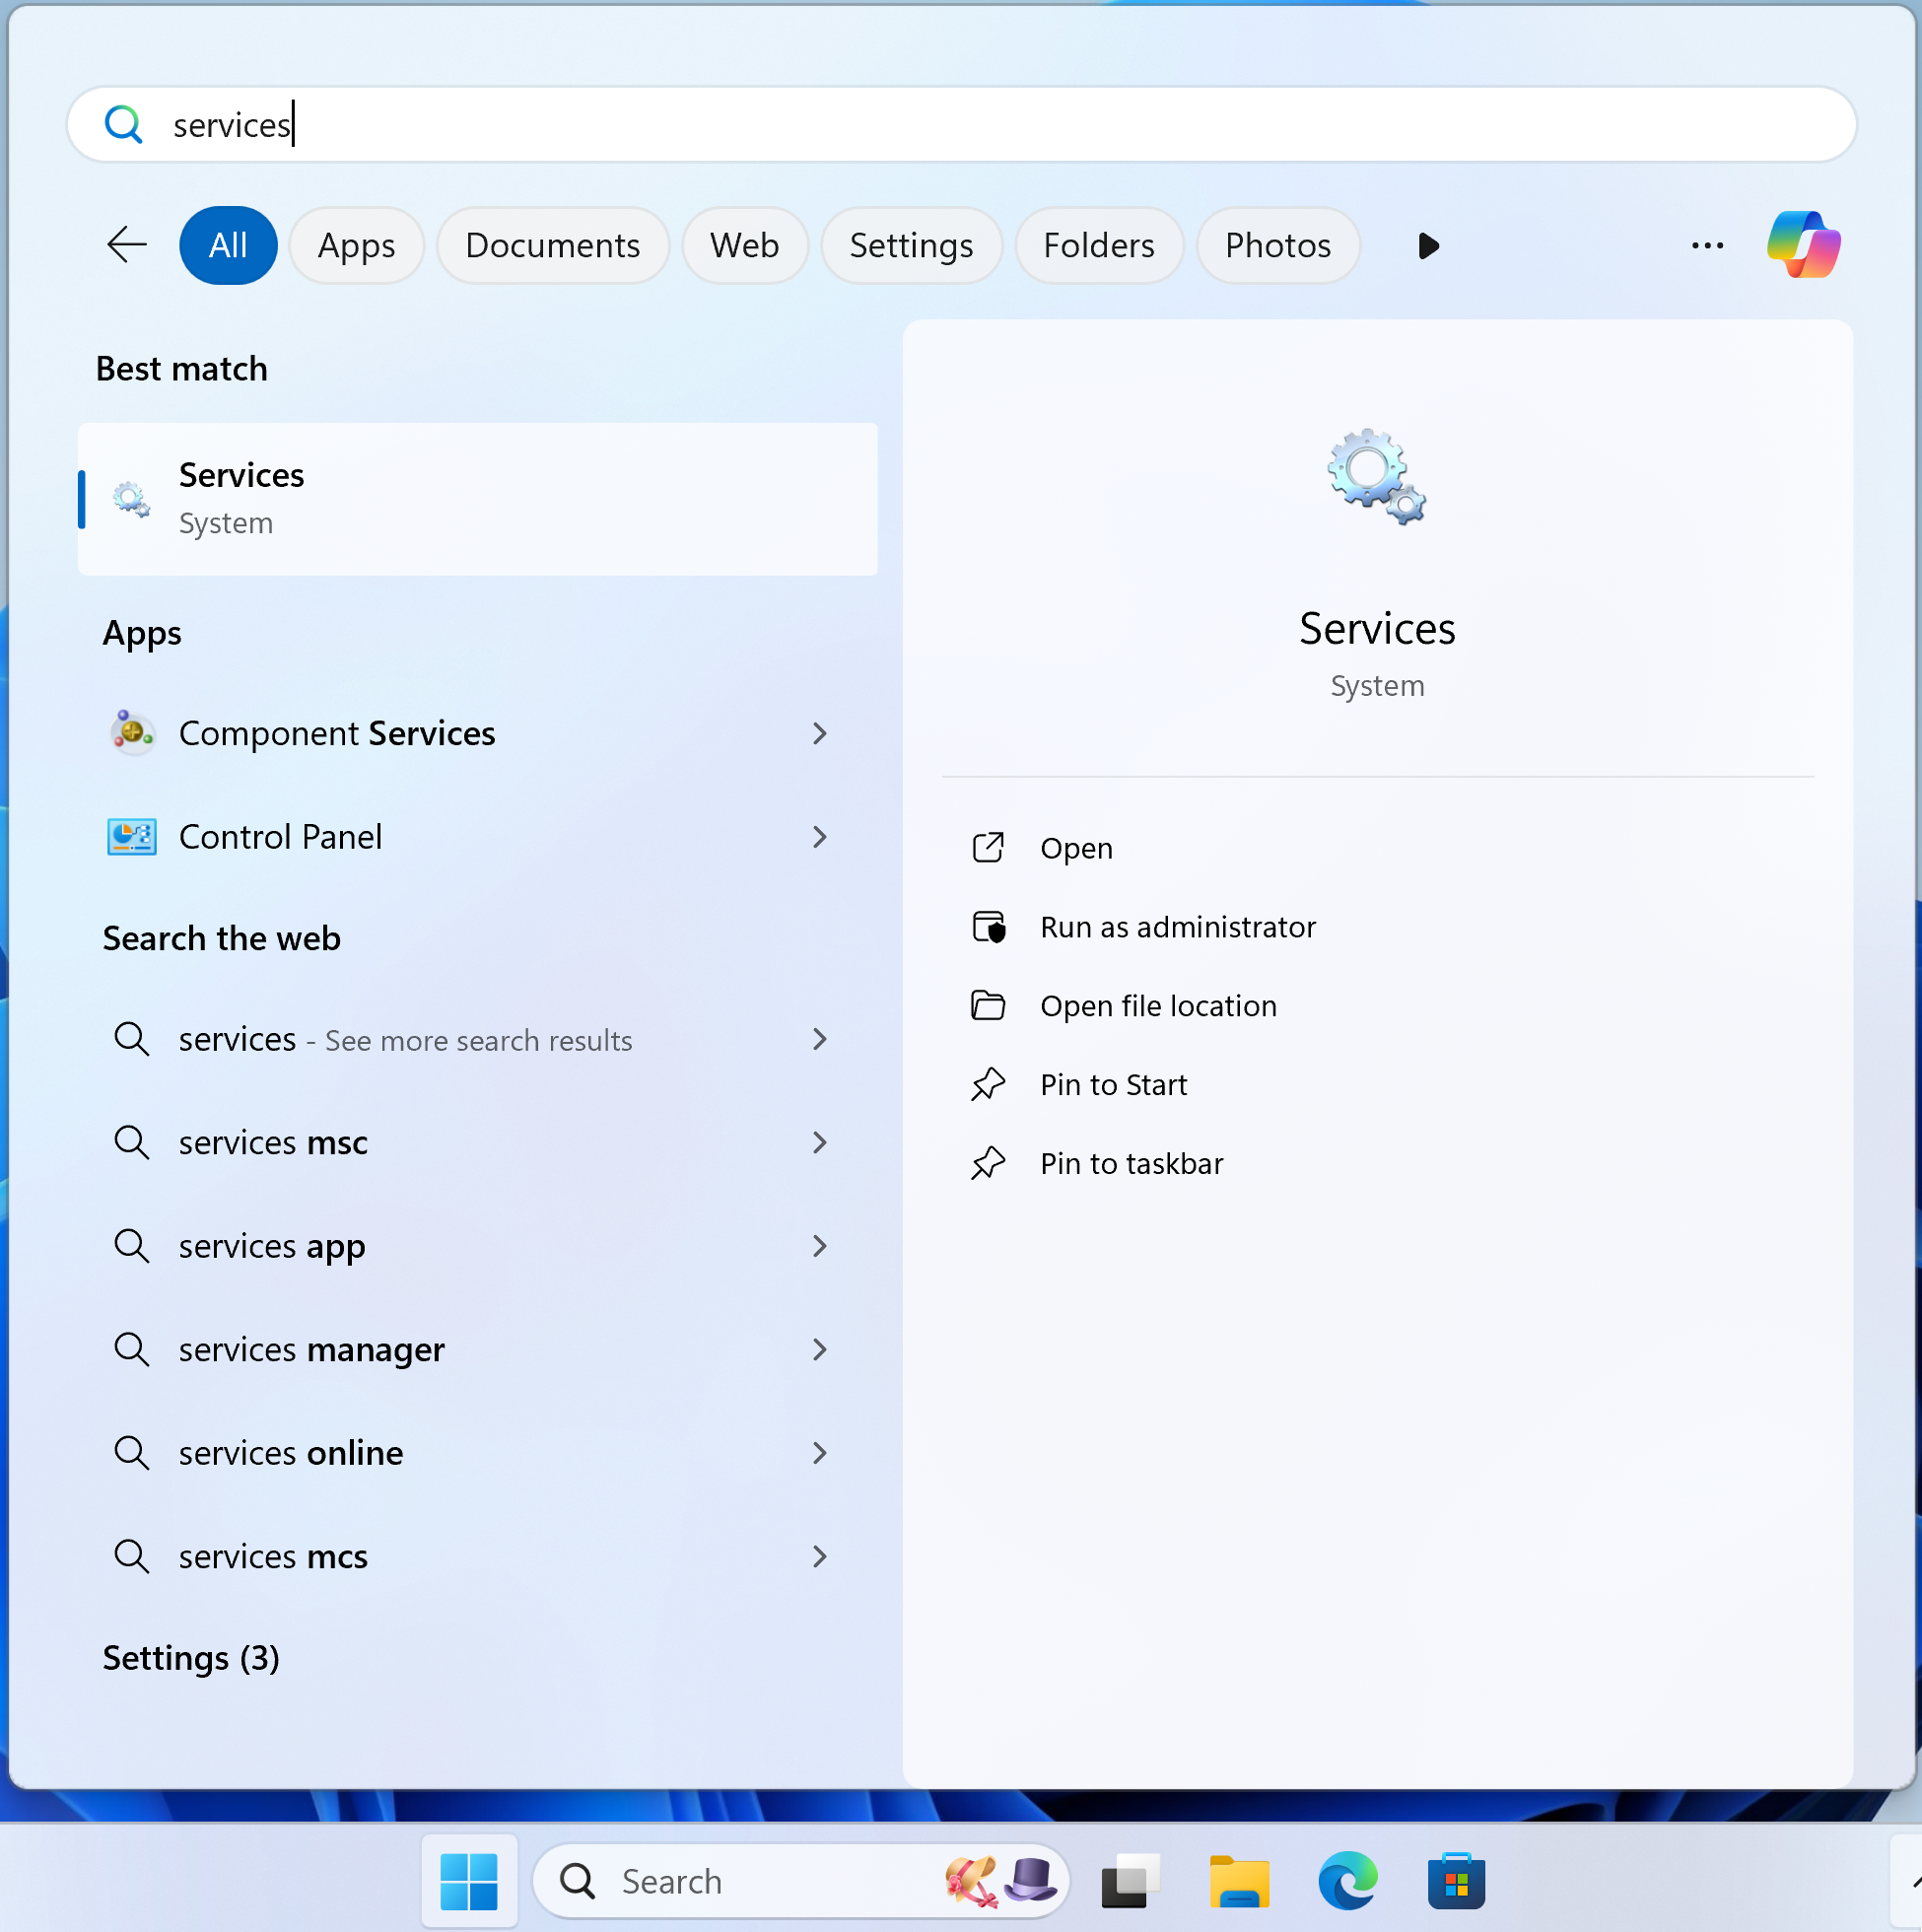
- Scroll down to find and double click Windows Update
- In the Startup type field, select Disabled
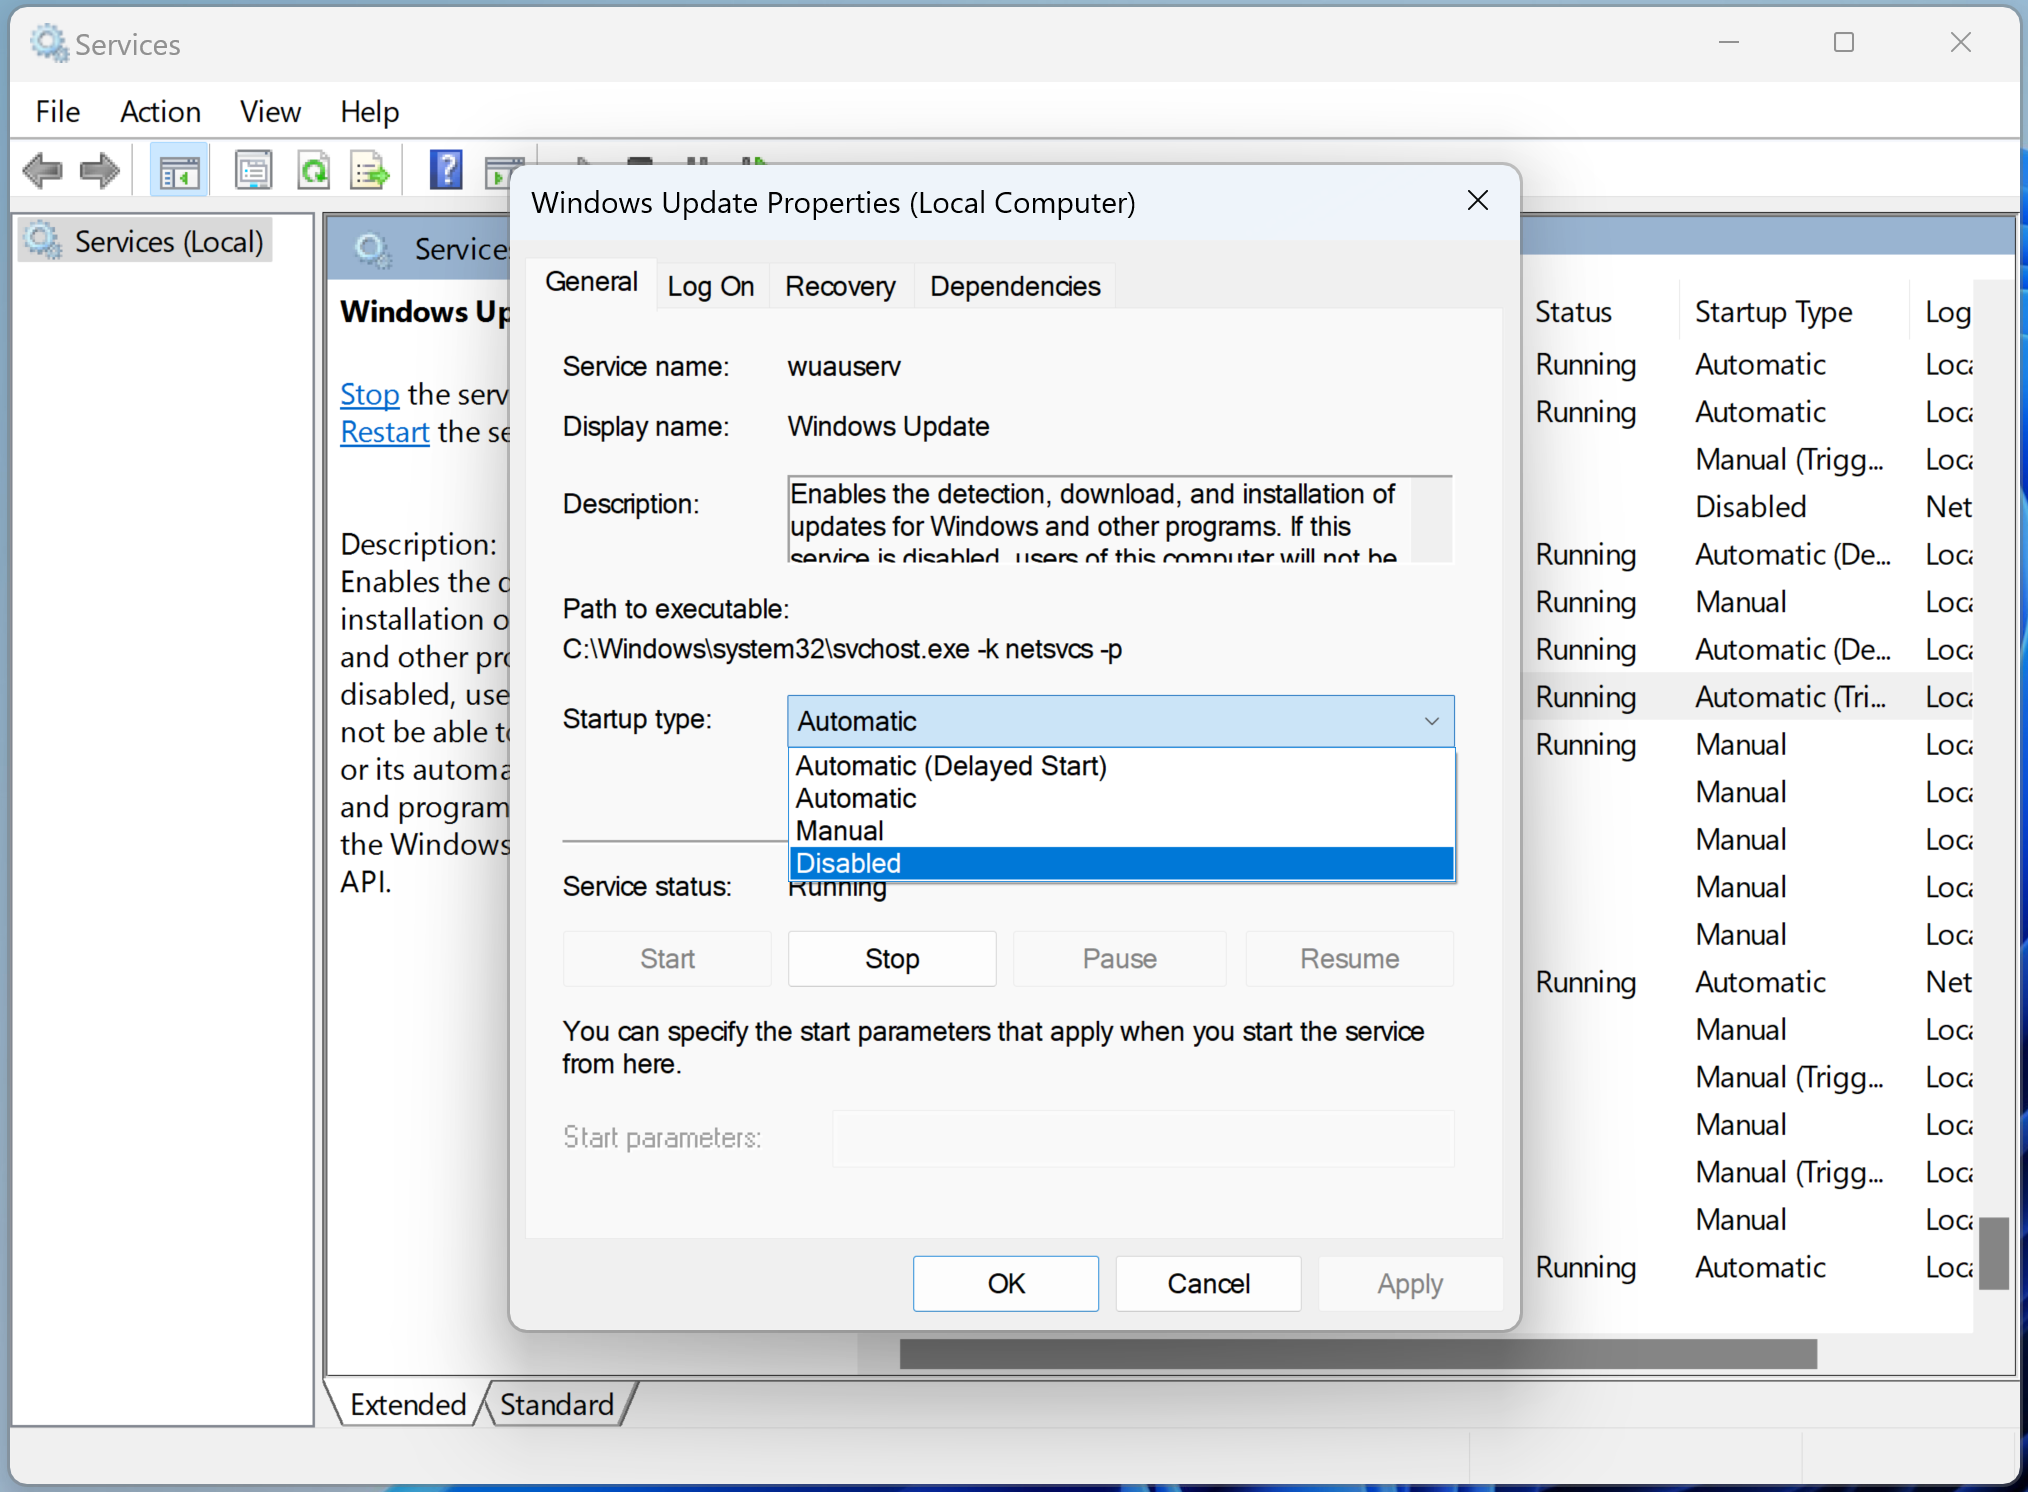
- Click Ok
Disable Energy Saving Mode
To make sure that the screen does not turn black after a few minutes, do the following:
- On the bottom left, click the Windows icon and then the gear icon.
- Type
Powerin the search field at the top of the window. - Click Power Options.
- Select the High performance plan (possibly hidden under Show additional plans).
- Click to the right of this plan Change plan settings.
- Select Never for all options.
- If available, set both Brightness sliders to the right most position.
Automatically Start Chrome On Startup
To make Google Chrome start automatically when Windows starts, do the following:
- Download this zip file and unpack it to the Desktop of your computer. Place the files
StartChromeForPlayr.cmdandplayr_loader.htmlon your Desktop. - Check if Chrome starts up by double clicking the
StartChromeForPlayr.cmdfile. If Chrome starts full screen and shows a Playr (player registration) page, then this works correctly. - On the bottom left, click the Windows icon and then type
Schedule. - Click Task scheduler.
- Choose Create basic task and name it
Start Chrome for Playr, click Next. - Set that this task has to be executed When I log in, click Next.
- Choose the action Start a program, click Next.
- Click the Browse button and select the
StartChromeForPlayr.cmdfile on the Desktop. - To make startup more smooth: check “Open the Properties dialog for this task when I click Finish” before you click Finish.
- Go to the Triggers tab, click At log on trigger and choose Edit...
- Under Advanced settings, check Delay task for and choose 30 Seconds. This way Chrome will start up 30 seconds after Windows has started. This will allow for network and internet connections to have been established.
Automatic Player Shutdown (Sleep Mode)
If you like to save some energy, you can set the computer to go into sleep mode when you like your channel to stop playing.
- On the bottom left, click the Windows icon and then type
Schedule. - Click Task scheduler.
- Choose Create basic task and name it
Shut down, click Next. - Set the trigger to Daily and click Next.
- Set the Action to Start a Program and click Next.
- Set the Program to
C:\Windows\System32\rundll32.exeand set the Argument topowrprof.dll,SetSuspendState 0,1,0and click Next. - On the last page check Open the Properties dialog for this task when I click Finish and click Finish.
- On the General tab under Security options check Run whether user is logged on or not and check Run with the highest privileges.
Automatic Player Startup
Create a task to automatically wake your computer out of sleep mode.
- On the bottom left, click the Windows icon and then type
Schedule. - Click Task scheduler.
- Choose Create basic task and name it
Start up, click Next. - Set the trigger to Daily and click Next.
- Set the time the computer has to wake up, set Recur every to 1 day and click Next.
- Set the Action to Start a Program and click Next.
- Set the Program to
ipconfig.exeand set the Argument to/renewand click Next - On the last page check Open the Properties dialog for this task when I click Finish and click Finish.
- On the General tab under Security options check Run whether user is logged on or not and check Run with the highest privileges.
- On the Conditions tab under Power check Wake up computer to run this task.
It depends on the computer you are using if this automatic startup is going to work. So be sure to test it. The alternative is to set auto-startup in the computer's BIOS. You will have to read the BIOS user manual to find out if and how that works on that specific computer. For more details on this, also check the Linux section.
Disable User Login
You want to disable user login so that the playback device automatically starts playing content when it's powered on.
- On the bottom left, click the Windows icon and then type netplwiz and press enter.
- In the User Accounts window that pops up, there should be a Users must enter a user name and password to use this computer option, if so uncheck it. If the option is not present you can make it "appear" by performing the following steps;
- Download this zipped registry file
- Unzip the file to get the registry file called
netplwiz.reg - Double click the
netplwiz.regfile to let it make a change in the Windows registry that will make the option appear - Now close the User Accounts window and open it again, the option will be present, uncheck it
- You will be prompted for the user's password, after which you can accept the new configuration with Ok.
Then remove the last sign-in restriction with with the following steps:
- On the bottom left, click the Windows icon and then the gear icon.
- Type Change the sign in the search field at the top of the window.
- Click Change the sign-in requirements.
- Under Require sign-in select Never.